Monday, April 27, 2009

Garbage can mixer.


5 parts perlite, 1 part portland cement, water and a garbage can. This is the insulation (4+ inches) that lays on top of the cement board , upon which a layer of concrete (about 4") goes, then the fire bricks lay on top of that. The fire brick in the mix is where the ash slot will be. Don't forget to click on the photos for the up close view of the details.

Saturday, April 25, 2009

Master of Ceremony


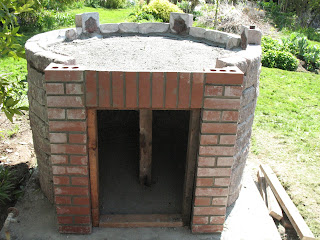
Each layer required several cuts so that the bricks could be connected to the wall with the brick ties and mortar. The final product looks flawless! Nice job Chris.

cutting and laying bricks


First time with a wet saw! These landscaping blocks were a bit of a bitch to cut and chip out with a hammer. They are for the layer that sits just above the hearth.

Thursday, April 23, 2009

il colosseo

This is the level on which the insulation and then the hearth will be built.
The strips in the front are mortared in and will be used to tie the bricks to the blocks.
To this point it was quite fast, the pace slows down a bit now.

And so on.


Gonna take you higher!

The other masons


These mason bees are busy collecting pollen to spin around the larvae, then they collect mud to pack the holes shut until next spring.

Rome was not built in one day.

Marking the perimeter, and mason bees


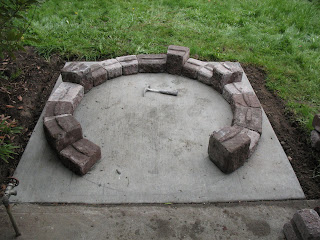
You can still sort of see the outline drawn on the slab which will be the outside perimeter of the oven. The rain washed most of it away. Chris (the one who knows what he's doing here) found the center of the slab and drilled a hole into it, left the drill bit into the slab and placed a pre-cut stake onto it. (something like that?). with the pencil towards the end of it and the drill bit in the center he drew the circle. (homemade compass) This is where we will start laying the bricks and roman stack blocks.
Here are the old and new mason bee condos. The weather has been a bit confusing for them. Hopefully they populate their new homes this spring. As you can see I'm not a craftsman, but Gina's painting helps distract the eye

laying one and a half yards of concrete


The Stoneway truck arrived, backed up the driveway and began filling up our wheel barrels. After dumping in 4-5 tons this is Fred putting a smooth finish to it. The edger tool gave the slab nice rounded sides and the brush gave the top that professional finish.
The top photo is Angelina putting the artist touch to it (with a nail).

Day 2: Setting the Rebar


With the help of Fred and Toby we dug out even more to at least 10" deep with the 4 so called pillars being about 20" deep.
We were a bit short on the rebar, but pretty close to the requested 1'-0" on the center. The rebar is suspended closer to the top half of the pit from the 4x4's laying across the frame. The wood, rebar, spikes, and all concrete tools were courtesy of Fred (sometimes referred to as Cousin, Great Uncle, or Concrete extraordinaire). We stopped for a little Mexican comida, while Fred worked his magic with the operators down at Stoneway Concrete.

Wednesday, April 22, 2009

Birth of a Brick Oven


Last Sunday we broke ground, removing an old rosemary bush and many loads of earth in the crappy wheel barrel (thanks to Craigslist).
The dimensions are 5'8" x 5'8" and needs to be at least 8" deep. As you will see finding terra firma was quite a bit deeper.